

In the world of programming nowadays there are lot of technologies and huge amount of frameworks to build any kind of application for any needs. But these technologies sometimes are divided into layers which intersect quite rarely. For instance, the Web world has numbers of Javascript frameworks that help to build vivid UI with various styles, animations, etc. On the other hand, banking software has to be robust, reliable and able to process huge amount of transactions per second. And another world is social networks that should provide a lot of content in mobile environment under conditions of slow internet and not very powerful devices. What if we try to pick up the strength of each technology and combine them?
Hi, I´m Mikhail from Centigrade. This is the first article of the technical blog series about GraphQL Web-API, its implementation in .Net 6.0 and how it should be consumed by React client.
Target application
I don´t want to create a new hello world or bookstore example to show graphql, .net and react in practice. I want to solve real existing user needs we have in our team to have a real use case for the demonstration. With benefits and disadvantages included.
Home office lasting through 2020 and 2021 broke our lifestyle and habits. Maybe IT guys were the only ones who did not notice it. But sometimes even we still need to say a couple of words to each other, share some IT news, discuss new tools, frameworks and cool features. For a long time our team has been using a special chat in MS Teams to stock the information about some good-to-know things, articles and other useful information. But such chat is not the right place for “Knowledge base”.
Quick internet scanning for ready-made solutions showed that ready-made “knowledge base” applications gave variety of tools with one disadvantage in common – all these applications were not developed by us. Let’s eliminate this disadvantage and create our own Knowledge base with blackjack and Hotchocolate. And call it VedaVersum! Veda = knowledge | Versum = Universum.
Our application will have:
- Authentication mechanism with every user to be logged-in
- Screen with the cards list. Every card to contain some text and some metadata with creation time, created user, assigned user (optional) and related card (optional)
- Panel with your avatar and name and “bell” icon which will show if you have any assigned card
- “Who’s online” panel. You can see other users coming and leaving in real time.
Why .Net 6.0?
Since we are going to build a distributed application which should support simultaneous work of more than one user, we need a backend service. When we are talking about backend, we mean stability, reliability, performance. There are just a few platforms that can provide such options. DotNet by Microsoft is one of the mature players in the field. And despite its maturity, it is up to date as it has never been before with its lightweight cross platform 6.0 version. Microsoft had done a lot to simplify the “entry threshold” into technology. They have made a lot of tutorials, they have simplified the tooling and development environment setup. Microsoft has built the best developers IDEs until now. You can use classic Visual Studio and Visual Studio Code or even any IDE you like and Command Line Interface. And just released new .net version 6.0 has official long term support from Microsoft. So a lot of developers start to use .Net in their new projects nowadays. But it still remains the good old .Net with its performance, huge code base, vast majority of the third-party libraries. And there is still-the-same-C# with decades of classic programming, OOP implementation, patterns and all the features which “bearded programmers” love. So, I got carried away. For our application we will need a classic web-server. Asp.Net project will fit our needs.
Why GraphQL?
GrapQL is a Opensource query language for Web API from Facebook. It ensures more flexibility and efficiency for the app developers than traditional REST API. You can build queries and fetch all the data or specific subsets of data you need in one request. GraphQL server will give you exactly the data you requested. This eliminates the over-fetching problem. Subscriptions are among other GraphQL killing features. The App developer are much more flexible by the benefit of a whole query language without the need waiting for API adoptions or changes. We will use it in our solution to notify all the users of cards changing, newcomers and also if someone has assigned a card to you. Also with GraphQL we have a lot of other pleasant out-of-the box features. Such as type checking, playground IDE and auto-generated API documentation.
Why React?
Single Page Applications based on JavaScript frameworks have firmly entered our lives leaving old-fashioned UI concepts behind. Again there is a couple of giants in the field which are very popular among the front-end developers. Angular from Google and React from Facebook. These are excellent UI technologies for creating interactive applications for web, mobile and other platforms. Nowadays React popularity is increasing day by day, it has support from Facebook and growing up community. Comparing React and Angular, I found that React is more lightweight, more simple, more declarative because it´s a UI Library and not a UI Framework like Angular is. And in case of our simple application, React will allow us to create reach powerful UI with less efforts.
Application design
You can see the basic architecture of the application:

Our application will have backend with GraphQL API, which will store entities in Database. And Single Page Application (SPA) client, that will communicate with API. In this article we will focus on Backend. Our backend will have two entities – User and VedaVersumCard. GraphQL will have couple of queries to get users and cards lists. And Mutation to create or update the card. And two subscriptions – UserAction (those who came or left), and CardChanged. All details you can see below.
Let’s get started
I’ll describe here all the steps you need to create a project from the scratch by yourself. Ready source code for this solution you can find on GitHub by this link
In this article we will create backend with GraphQL API from scratch. So, let’s do it.
First of all, you should have .Net 6.0 SDK installed. You can use Visual Studio 22, or use VS Code (or any other IDE you like) with Dotnet CLI
We will create the “ASP.NET Core Empty” project with “ASP.NET Core 6.0” framework and name it VedaVersum
In Visual Studio we can follow a few simple steps – start “New Project”, choose “ASP.Net Core Web Application”, then “ASP.NET Core Empty”, then choose target network and then give a name to the project.
If you are using VS Code, open command line and run these commands:
md VedaVersum
cd VedaVersum
dotnet new web
code .
This creates a simple ASP.NET application with 2 classes – Program With Main method, which constructs and runs the web host. And Startup which has 2 methodes. One for setup all needed services in Dependency Injection Container, and second is for setup HTTP Request pipeline. This is how initial Configure method looks like:
// This method gets called by the runtime. Use this method to configure the HTTP request pipeline.
public void Configure(IApplicationBuilder app, IWebHostEnvironment env)
{
    app.UseRouting();

    app.UseEndpoints(endpoints =>
    {
        endpoints.MapGet("/", async context =>
        {
            await context.Response.WriteAsync("Hello World!");
        });
    });
}
ASP.Net is arranged so that each HTTP request goes through pipeline of handlers called Middleware. Configure method describes what middleware will be involved into pipeline. For the moment, there are only Routing middleware and simple endpoint handler that intercepts request to the root address and returns plain text “Hello World” as the HTTP response. We can run just created application (in VS Code by command dotnet run), and take a look to that “Hello World” in the browser.
So far so good. The scaffold of our API is ready, it’s time to add something meaningful to it. Let’s start from our data model. Now we will create folder Model in our solution, and add entities User, VedaVersumCard, enum VedaVersumCardAction and CardActionMessage
Making GraphQL API
As far as we have created our main entities, it’s time to provide our users the abilities to operate them. Our backend should be able to make standard CRUD operations. Such as create new Knowledge Base cards, read existing cards, edit cards, delete cards and notify users if cards were assigned to them. In terms of GraphQL we should define a Schema and the methods that changes data called Mutations, methods that requesting data called Queries and push notifications from server to client called Subscriptions. To implement the Schema with queries, mutation and subscriptions with any known platforms such as .Net, we should implement methods called resolvers. And there are also should be mappers from native dotnet objects into GraphQL object and input types.
There are several third-party libraries for making GraphQL API with .Net. Here is the list.
The graphql-dotnet supposes you to describe all the ObjectTypes manually. This means that for each dotnet business entity you should have appropriate ObjectType. Since we have only two entities, it’s not a big problem. But if we have a rich data model this approach makes solution a bit messy and complicated.
In Hotchocolate object types are created “under the hood”, and you can use dotnet business entities right in the resolvers and mutations with no additional classes and conversions. And we will take this library for our solution because everybody love chocolate.
To use it in our project, first of all we have to reference Hotchocolate assembly as Nuget package. You can use Nuget Packages Manager in Visual Studio to add package HotChocolate.AspNetCore. In VS Code you should run command
dotnet add package HotChocolate.AspNetCore
Our GraphQL API service will have queries, mutations and subscriptions. To implement them we should create three separate classes – VedaVersumQuery, VedaVersumSubscription and VedaVersumMutation. At the moment there is no implementation and I will not write the whole code here, later I will provide the link to the final solution, so you can download it and test.
So, queries are just simple c# methods. For example:
/// <summary>
/// Returns all cards in the base
/// </summary>
public Task<IEnumerable<VedaVersumCard>> GetAllCards()
{
    // Return mock object so far
    return Task.FromResult<IEnumerable<VedaVersumCard>>(new[] {new VedaVersumCard
    {
        Id = Guid.NewGuid().ToString(),
        Title = "Very First Card.",
        Created = DateTimeOffset.Now,
        Content =
            "Lorem ipsum dolor sit amet, consectetur adipiscing elit, sed do eiusmod tempor incididunt ut labore et dolore magna aliqua.",
        UserCreated = Guid.NewGuid().ToString()
    }});
}
For subscriptions we will use InMemorySubscription mechanism and ITopicEventSender provided by HotChocolate. To hook our method to that mechanism, we will add two attributes – Subscribe and Topic. And that’s all. This is how subscription looks like:
/// <summary>
/// Subscription event fires when new user arrives online
/// </summary>
/// <returns></returns>
[Subscribe]
[Topic]
public User UserArrived([EventMessage] User user)
{
    return user;
}
In our mutation class we will inject ITopicEventSender and use it to fire the subscription event:
/// <summary>
/// Notification about user enter
/// </summary>
public async Task<User> UserEnters(string userId)
{
    // ToDo: Mock implementation.
    var user = new User
    {
        Id = userId,
        Name = "Anakin Skywalker",
        UserImage = "https://static.wikia.nocookie.net/starwars/images/6/6f/Anakin_Skywalker_RotS.png"
    };

    await _iTopicEventSender.SendAsync(
        nameof(VedaVErsumSubscription.UserArrived),
        user);
    return user;
}
And now the most important thing – setup services and pipeline middleware. Let’s change Startup class like this:
public class Startup
{
    // This method gets called by the runtime. Use this method to add services to the container.
    // For more information on how to configure your application, visit https://go.microsoft.com/fwlink/?LinkID=398940
    public void ConfigureServices(IServiceCollection services)
    {
        services
            .AddGraphQLServer()
            .AddInMemorySubscriptions()
            .AddQueryType<VedaVersumBaseQuery>()
            .AddMutationType<VedaVersumMutation>()
            .AddSubscriptionType<VedaVersumSubscription>();
    }

    // This method gets called by the runtime. Use this method to configure the HTTP request pipeline.
    public void Configure(IApplicationBuilder app, IWebHostEnvironment env)
    {
        app
            .UseWebSockets()
            .UseRouting()
            .UseEndpoints(endpoints =>
            {
                endpoints.MapGraphQL();
            });
    }
}
As we can see HotChocolate does all the “dirty work” for us ConfigureServices method sets up all needed services and hooks up our query, mutation and subscription classes. Configure method sets up WebSockets middleware which is necessary for subscriptions, and then maps GraphQL endpoint.
The last but not the least. If you have ever used GraphQL before, you already know that each GrpaphQL endpoint provides some metadata which describe the API. And there are couple of powerful tools like Graphiql and Playground. These tools provide some kind of GraphQL IDE. You have a whole documentation as a serviceabout all queries, mutations, subscriptions and data types that provide the endpoint out of the box. And this information is also used as intellisense tooltips when you are writing GraphQL queries in the integrated playground there. Maybe you noticed in the code samples above, I’m using XML comments with query, mutation and subscription methods. These comments HotChocolate can build as GraphQL method description and add to the endpoint metadata. To make it happen, you should edit your VedaVersum.csproj file like this:
<PropertyGroup>
    ...
    <GenerateDocumentationFile>true</GenerateDocumentationFile>
    <NoWarn>$(NoWarn);1591</NoWarn>
</PropertyGroup>
This will generate documentation file from that XML comments each time you compile your project.
Banana Cake Pop IDE
In previous versions of hotchocolate library, there was built-in Playground IDE, starting from the version 11, developers created their own IDE Banana Cake Pop. Now if you start our application and go to localhost:5000/graphql, you should see that Banana Cake Pop IDE. If you click a book button on the left, you will see the whole API description.
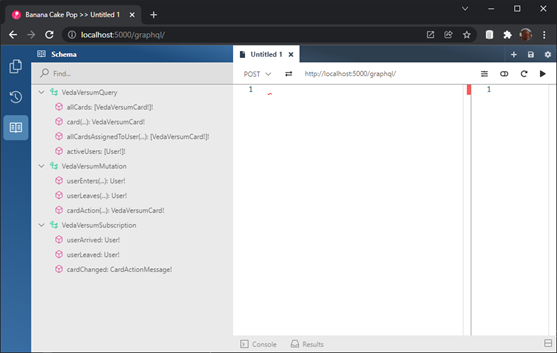
You can try to query data:

To start the subscription, you should open two windows, in one of them write this query and hit “play” button:
subscription {
  userArrived {
    id
    name
    userImage
  }
}
In the second window write this mutation and hit “play” button:
mutation {
  userEnters(userId: "123-abc") {
    id
  }
}
In the first window you will see that subscription message has appeared:

Conclusion
We have take a look how simple it can be to create GraphQL API using .Net 6.0 and Hotchocolate library, and query this API without any Single Page Application or javascript client sided code. In the next article we will add Authorization to our application, will store all the data in the database, will see all the benefits of GraphQL Data Loaders and finish all the Backend logic. The last part will then focus the Frontend with React. Stay tuned…
